This post is being prepared as an independent research project for a class. You will learn more if you invest time at the links presented in the first couple paragraphs. OpenStack at the time of writing this can be a decently large en-devour. This guide is not intended to answer all your questions, but generate questions more than anything.
Get stacked
This is a briefed installation guide supplemented with some basic usage instructions. There are many ways to install openstack though, so this is far from the end all to installation. In fact, installation can be an absolute pain. I attempted to install by hand to 3 different resources without success over a half dozen times. I created bug reports, received resolutions, reported bug reports caused by the resolution and so on. I was not successful, however the documentation on OpenStack is actually pretty great. It’s just that like any opensource project involving many dependencies, it’s a moving target. If you’d like to try your hand on installation the manual way, head on over to…
https://docs.openstack.org/project-install-guide/ocata/
I think you’ll be pretty impressed with the documentation, but it took me nearly 2 hours for every installation with me just hammering away at the keyboard trying to adjust all the config files. I learned a lot about OpenStack which helped me during a scripted install, but I cannot say I was able to get an environment up and running using the Ocata (current OpenStack release) Installation Tutorials. Looking back, I wish I could have got it all working because I was aiming to have 2 seperate compute nodes, a networking node, a storage node, and node just for the dashboard. But for proof of concept and getting a basic understanding of OpenStack, I may have been biting off more than I could chew.
RDO
RDO was the answer to my pains. They say if you want installation ease and the best support, stick with ubuntu, but bah! I’m a fedora/redhat/centOS guy! Don’t you tell me what to do! RDO is a and openstack installation script + bells and whistles project specifically for all that I just mentioned. Fedora/CentOS/RHEL.
https://www.rdoproject.org/
Now just because it’s a script made for my distro of choice doesn’t mean it was perfect. At the original time of installation (March 2017), I still had a few tweaks I had to make to get everything up and working. For the purpose of this post and for class, I’m going to suck it up and perform the installation all over again so I can document my trials. My intent was to document from the beginning, however after so many failed attempts, I wasn’t sure what installation method would work, so documentation wasn’t done at the original time of installation. But it’s my fault for waiting over a month to do this all again though! That’s going to make some of this hazy as I revisit that part of my brain.
My installation has gone without a hiccup. Everything listed here “at the time of writing” should just work.
OpenStack Architecture
I need to describe first the key components or “moving parts” of openstack. This is a big part of why openstack is not the easiest thing to install, all the independent entities. All of these services can be installed on one host, or split among many. Some services such as compute (nova, hang on we’re getting there) can be placed on many servers/hosts. The actual architecture is up to the engineer. This puts a lot of power in the engineers hands and is exactly what adds to the complexity of deploying an OpenStack environment. This is not deploying a pre-canned esxi datacenter here. This is truly building out an infrastructure to your recipe. Below I lay out all the parts…
- Nova – Compute – This is what actually runs any containers or vm’s
- Cinder – Block Storage – Where VM and Container storage is provisioned and managed
- Glance – Image – VM and Container images or templates are managed by Glance
- Horizon – Dashboard – This is the web service that allows a graphical interface to OpenStack
- Neutron – Networking – The networking service and all SDN aspects are handled by this service
There are other services you can deploy to an OpenStack infrastructure, but our proof of concept really only relies on those listed above. Each component is another independent or child opensource project, hence again the difficulty in orchestrating a successful OpenStack infrastructure. There are two other things worth mentioning though. A sql database (because where isn’t sql) and keystone. Keystone actually handles authentication and permissions for the all the services within an OpenStack environment. Basically every service must first authenticate through keystone. If deploying an environment, understanding this relationship is critical as you “will” be sifting through logs trying to understand why a specific part of the stack isn’t working. In my experience thus far, keystone is always the first thing to check. Ensuring that the broken service has access to the sql database it requires along as access to any other needed stack services.
For the purpose of this demonstration/lab, we are deploying all services to a single instance. This will allow ease of management and should simplify any troubleshooting.
Networking
Networking requires special mentioned with OpenStack. There are a few ways to set it up, but for us, we’re going a pretty simple route but not bare bones. Pretty simple still requires explanation though. Remember, this is assuming a single host running all OpenStack services.
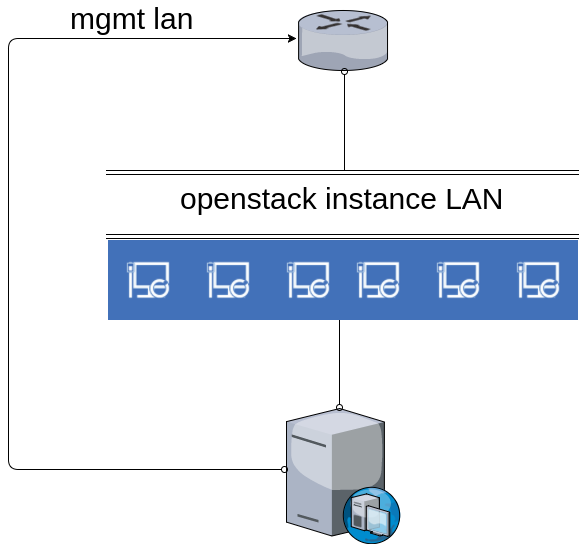
So here we have our OpenStack server with the management LAN labeled on the left. This is where we will access the servers web gui or cli/ssh from. This is the main IP of our host. In
addition to that, we have another interface just for our instance/vm/containers. While you could allow these instances to be placed on any network, for management it would really be best to have everything on a separate LAN to dictate access rules and control IP space. The Blue PC’s indicate OpenStack instances in this example. The key point to remember here is that Neutron controls what is conveyed to these instances. Any instance will be assigned an IP from Neutron as well as it’s default gateway, DNS, etc. Be sure that if you are sharing this IP space with a DHCP server that the DHCP server does not hand out IP’s that Neutron can, or vice versa.
Also worth mentioning is that this kind of deployment is considered deploying to a “provider network” where you’re relying on a physical network (iron switches and routers) to handle the traffic of the instances. OpenStack can do much much more however, including vxlan. SDN is at OpenStack’s heart but is beyond not only this post, but my current abilities. I tried to get it off the ground, but failed.
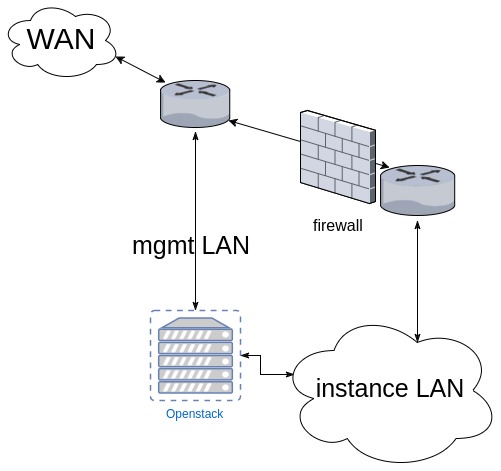
For my installation, I will have a buffer between my real LAN and any instances. My topology is abbreviated below. The instance LAN is it’s own dedicated subnet and ospf allows a route to the WAN if needed. By default, an RDO installation assumes a 172.24.4.0/24 subnet. For installation ease, this is exactly what I set up for the installation. This avoids having to make any configuration changes to neutron. (you remember what neutron does for us, right?)
Foundation
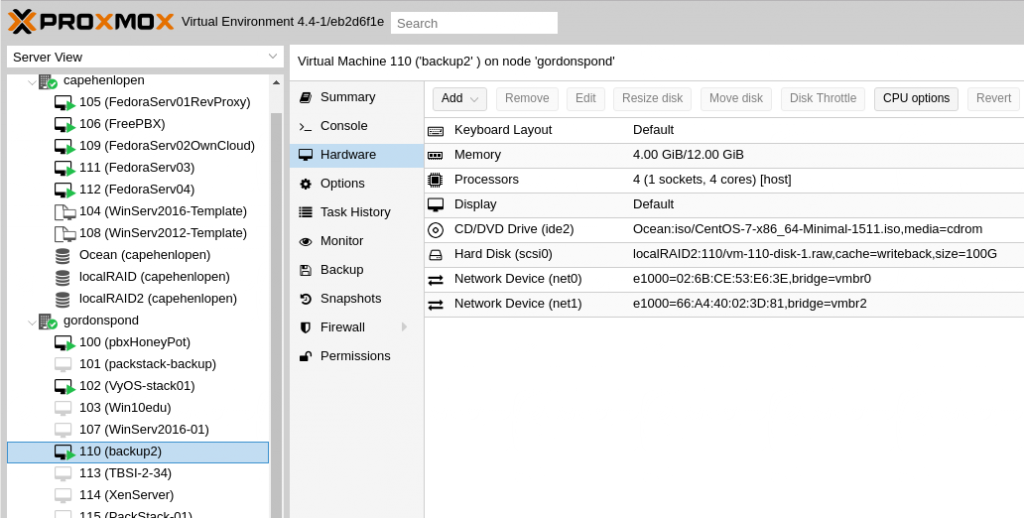
So to get off the ground we’re going to use a single CentOS 7 installation and make a few preliminary changes. Just as an FYI, I’m running this as a VM on a proxmox cluster and it runs pretty well. Virtualization on esxi should provide similar results. Provisioned resources are seen below
Configure Networking
Set the IP of your first or management interface. Do not bother setting an IP to your secondary or instance interface though, that will be configured after installation.
Identify your interface with ifconfig and pull up your interface configuration with
vi /etc/sysconfig/network-scripts/ifcfg-ens18
My interface name is ens18. Your file should be edited to resemble
TYPE="Ethernet"
BOOTPROTO="none"
DEFROUTE="yes"
IPV4_FAILURE_FATAL="no"
IPV6INIT="yes"
IPV6_AUTOCONF="yes"
IPV6_DEFROUTE="yes"
IPV6_FAILURE_FATAL="no"
NAME="ens18"
UUID="a9ceb537-7e3d-4409-83e4-77e76e2a698f"
DEVICE="ens18"
ONBOOT="yes"
IPADDR="10.17.17.51"
PREFIX="27"
GATEWAY="10.17.17.33"
DNS1="10.17.17.36"
DNS2="8.8.8.8"
IPV6_PEERDNS="yes"
IPV6_PEERROUTES="yes"
IPV6_PRIVACY="no"
The purpose here is just to set it to a static address and give it a default gateway and dns. Don’t overthink it.
Update and get needed packages
Update with
yum update -y
Then go ahead and install net-tools
yum install net-tools -y
We’re going to be using net-tools instead of the default network manager from now on. So lets stop it, and then disable it from starting at boot
systemctl stop NetworkManager
systemctl disable NetworkManager
Now lets start and enable net-tools at boot
systemctl start network
systemctl enable network
And that’s about it. Let’s get RDO!
Before moving on, if any updates installed a new kernel, go ahead and give a healthy reboot now
RDO installation
First lets add the needed Repo’s
yum install -y https://rdoproject.org/repos/rdo-release.rpm
yum install -y centos-release-openstack-ocata
and update
yum update -y
Now we just need to install the package with
yum install -y openstack-packstack
And that’s really it. All that’s left to do is pull the trigger. Run
packstack --allinone
and go get a coffee, beer, kombucha, or have a sandwich. This is going to take a while. In my experience, between 15 to 20 minutes is normal.
Post installation environment
First thing’s first. Go to the IP of your server and make sure you see
Then ssh to your machine (if you’re not already) and check your home directory.
[root@packstack01 ~]# ls ~/
anaconda-ks.cfg keystonerc_demo
keystonerc_admin packstack-answers-20170424-194821.txt
The keystonerc_* files are user files including the username in the filename (admin and demo) and you’ll find the password to each in the file. These are what you can use to login to the web portal with.
for example,
more ~/keystonerc_admin
should show something like
unset OS_SERVICE_TOKEN
 export OS_USERNAME=admin
 export OS_PASSWORD=<RANDOM PASSWORD GENERATED BY INSTALL>
 export OS_AUTH_URL=http://10.17.17.51:5000/v3
 export PS1='[\u@\h \W(keystone_admin)]\$ '

export OS_PROJECT_NAME=admin
export OS_USER_DOMAIN_NAME=Default
export OS_PROJECT_DOMAIN_NAME=Default
export OS_IDENTITY_API_VERSION=3
and if you ever need to use the admin credentials, just run
. ~/keystonerc_admin
and you’ll be able to execute openstack commands from the CLI with the admin credentials. The same works for the demo account as well. This is very handy for troubleshooting.
packstack-answers-<$date>.txt will show you any arguments used during installation. Yes you can specify parameters prior to installation. If you’d like to experiment, hang onto that file and simply edit it and re-run the packstack while referencing that file! See RDO for more information.
Log Files
Lastly and maybe most importantly, you should be aware of some log files. Unless all bugs have been fixed, you may be using them. Don’t forget the value of
tail -f /<yourlogfile>.log
This list is not comprehensive but is what I found I used to diagnose issues. Google or your brain should be able to help you should you need more help.
/var/log/glance/api.log
/var/log/nova/<quite a few in here>.log
/var/log/keystone/keystone.log
/var/log/neutron/server.log
/var/log/httpd/horizon_access.log
Remember how we went over the different services that make up OpenStack? Above is why. If something is not working, you will need to know what service to suspect or start with and start the troubleshooting process there.
Post install Network Config
As mentioned before, we never set up our second interface. In our example, my interface is ens19. We’re going to build whats called a linux bridge. Getting into networking a linux box is a bit deep, but I will say that you should learn. White box switches/routers are becoming not so uncommon in large enterprise networking and I truly think it’s the future. These boxes run on a little thing called linux. I need to put more time into it myself.
So step one is just to copy our current ifcfg-ens19 to a backup. So lets get over to the right directory and get that copied
cd /etc/sysconfig/network-scripts
cp ifcfg-ens19 ifcfg-ens19.backup
Now lets copy ens19 to a new file named br-ex
cp ifcfg-ens19 ifcfg-br-ex
Now lets edit each file. A lot of this is more along the lines of “go learn this,” so just be aware of the unique values in your config files. Specifically HWADDR (mac) and UID Keep those values as well as the NAME.
ifcfg-ens19
TYPE=OVSPort
NAME=ens19
UUID=ac1b9b58-a3c9-4b2d-96e2-ae33272d82ce
DEVICE=ens19
ONBOOT=yes
DEVICETYPE=ova
OVS_BRIDGE=br-ex
HWADDR=66:A4:40:02:3D:81
ifcfg-br-ex
TYPE=OVSBridge
DEVICE=br-ex
DEVICETYPE=ovs
BOOTPROTO=static
NAME=br-ex
ONBOOT=yes
IPADDR=172.24.4.1
PREFIX=24
GATEWAY=172.24.4.254
PREFIX=24
DNS1=8.8.8.8
So what this is doing is basically making the Bridge our ethernet device, and freeing up the physical interface for other services to use it (instances.) From here, you need you restart your networking service. If you’re following this to a T however, you have yet to reboot. Why don’t we go ahead and do that now. Once that’s complete, if you’re using the same IP scheme you should be able to ping 172.24.4.1. Now due to firewall and routing on my network, I had to ssh to my 172.24.4.254 router to do this, so if you’re having issues, ensure you’re on the LAN to 172.24.4.0/24 when you do this to be certain so you’re not chasing your tail.
Out of the cli and onto the web GUI
This is bare bones, “lets get up and running with a public IP instructions”
I may add a section on adding an nfs share to Cinder because doing so was very useful given my environment, but that’s going to depend on time. For now lets press forward and get logged into the web interface and ensure everything works. If for some reason something doesn’t work, remember what services apply to each function and use the available log files! So lets backtrack to when we ensured we could see

at our servers IP and also reference those files
~/keystonrc_admin
~/keystonerc_demo
where we will find our login credentials. For testing the functionality of the installation, just stick with the demo account. If you’re part of the group I’m going over this with referencing my personal installation, I will provide you with login credentials. Familiarize yourself with the interface. There really isn’t that much to it. Most of everything a user will be interacting with will be under
Project,
- Compute
- Network
- Object Store
If you’re familiar with AWS, google compute, Rackspace etc, most of whats available will relate to existing knowledge. If not, then why are you messing with OpenStack? There’s a safer place!
Generate a Private Key Pair
This couldn’t be easier. From the navigation pane on the left, click Compute -> Key Pairs and then click Create Key Pair on the right. Once you choose a name it will create it for you and should automatically start the download of the pair. As with other IaaS providers, this is your one shot to download that key and retain it.

Network Setup
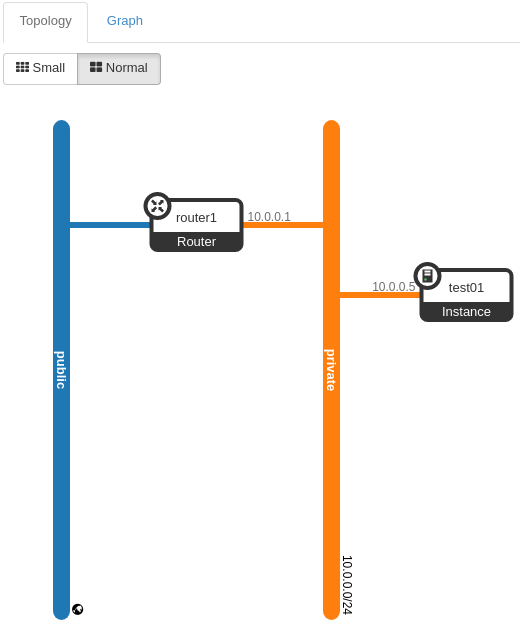
All that you can administer to your network is going to depend on the services offered by the OpenStack provider. In this circumstance we’ll focus what we’re offering in the example. We offer virtualized private networks for VM’s, and Static “Public” IP’s. Now really the Public IP’s are private IP’s behind NAT on a subnet I built, but I don’t think you can blame me for not having 253 static IP’s delivered to me home to hand out to OpenStack users. Below we see a topology map that is available to you as a user by going to Network -> Network Topology.
We can then take a look at router1’s details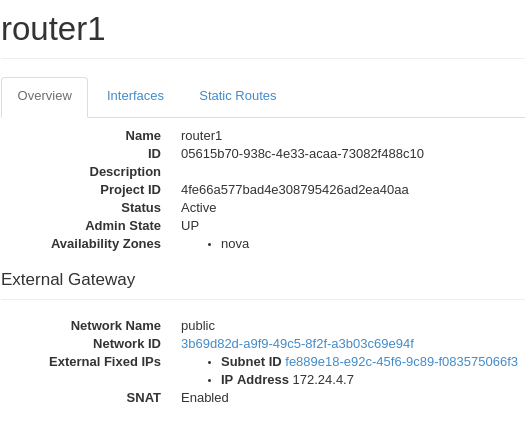
And this is where we can see that “Public IP” that allows us to access a router from the web. Remember, just as with AWS or any IaaS provider, you can place a router any place you’d like and build some truly complex networks if needed. However virtualRouters are not where access rules will be placed. The individual vm’s will contain those rules while the routers simply connect subnets and route.
Assigning a Static IP to a particular VM
Bypassing the virtual router and giving an instance an IP is similar to other providers. Still within Networks, Click Floating IPs and you can see the option to Allocate IP to Project. It is possible to have multiple pools of IP’s to choose from, but for this circumstance, we have one.

Once allocated, the IP will be available to a VM within your project. We’re going to wait to do this as we have yet to spin up a vm.
Security
Before we create our VM, lets get s security group together. Much like AWS, it’s a simple matrix white listed rules. Anything inbound or outbound must be explicitly declared or traffic will be assumed illegal.

For testing purposes, lets be sure to enable ICMP from any (0.0.0.0/0 …I shouldn’t have to tell you that, you’re networking majors for Pete’s sake!)
Spin Up
With that, we’re ready to go for our first basic VM. Included in OpenStack there is a basic minimalist VM called cirros. You can create your own images or import existing as well. I had fedora and ubuntu (rich can vouch for that if he ever logged into the account I gave him) but it’s been removed to allow everyone to create a VM without crashing the server. cirros is an absolute minimalist linux VM.
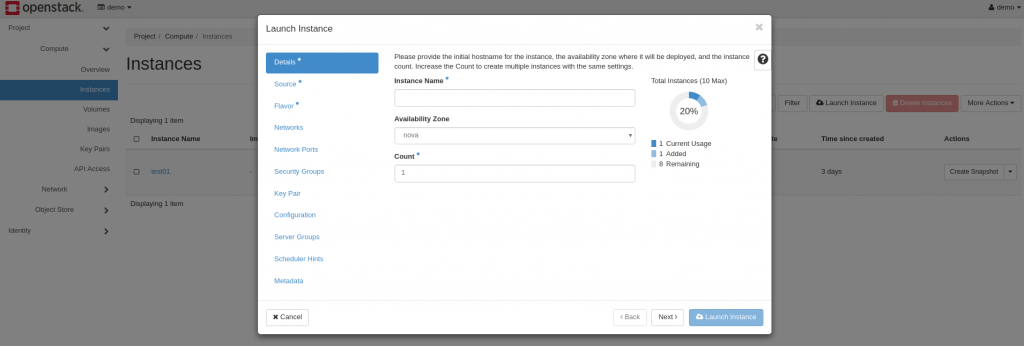
So by now you should be able to figure most of this out yourself. Pick a name, source (image file (cirros)), flavor (tiny please, seriously don’t try anything else if you’re doing this on my server) etc etc. Be sure to pick your private key pair as well!
Once your VM is up, under Actions select Associate Floating IP and you should find what you provisioned earlier.
As a basic intro, this about covers it. If time permits I may add some stuff and/or touch on a few things in class.
Administration
I want to give a quick example of some CLI administration. While you can perform some basic admin functions via the web interface, the CLI is going to provide the most power. So for class I wanted to create a pool of users and assign them all to the same project. I’ll use this as an example.
OpenStack commands are called via
openstack
as a prefix. The best resource is going to be
https://docs.openstack.org/cli-reference/
For our example, we want to create a project and then create users.
We can create a project with
openstack project create <projectname>
and then create users with
openstack user create --project new-project --password PASSWORD new-user
and then assign roles with
openstack role add --user USER_NAME --project TENANT_ID ROLE_NAME
To demonstrate how this beats creating users through the GUI, I tackled that pool of users with a simple script just using a while loop…
#!/bin/bash

#source openstack admin credentials
. ~/keystonerc_admin

#create "counter" variable for while loop
x=0

#while loop to run while x is less than 10
while [ $x -lt 10 ];
do
 #increment "counter" variable
 let x+=1

#append counter variable to baseline username and password
 student="fakenameprefix"$x
 password="fakepasswordprefix"$x

#create user and assign to project
 openstack user create --project studentProject --password $password $student
echo "user created"
#assign role to user to enable web gui login
 openstack role add --user $student --project studentProject _member_
echo "role assigned"

done
I’ve sanitized the student and password fields, but this should demonstrate how you can start utilizing the OpenStack CLI to make bulk changes.

